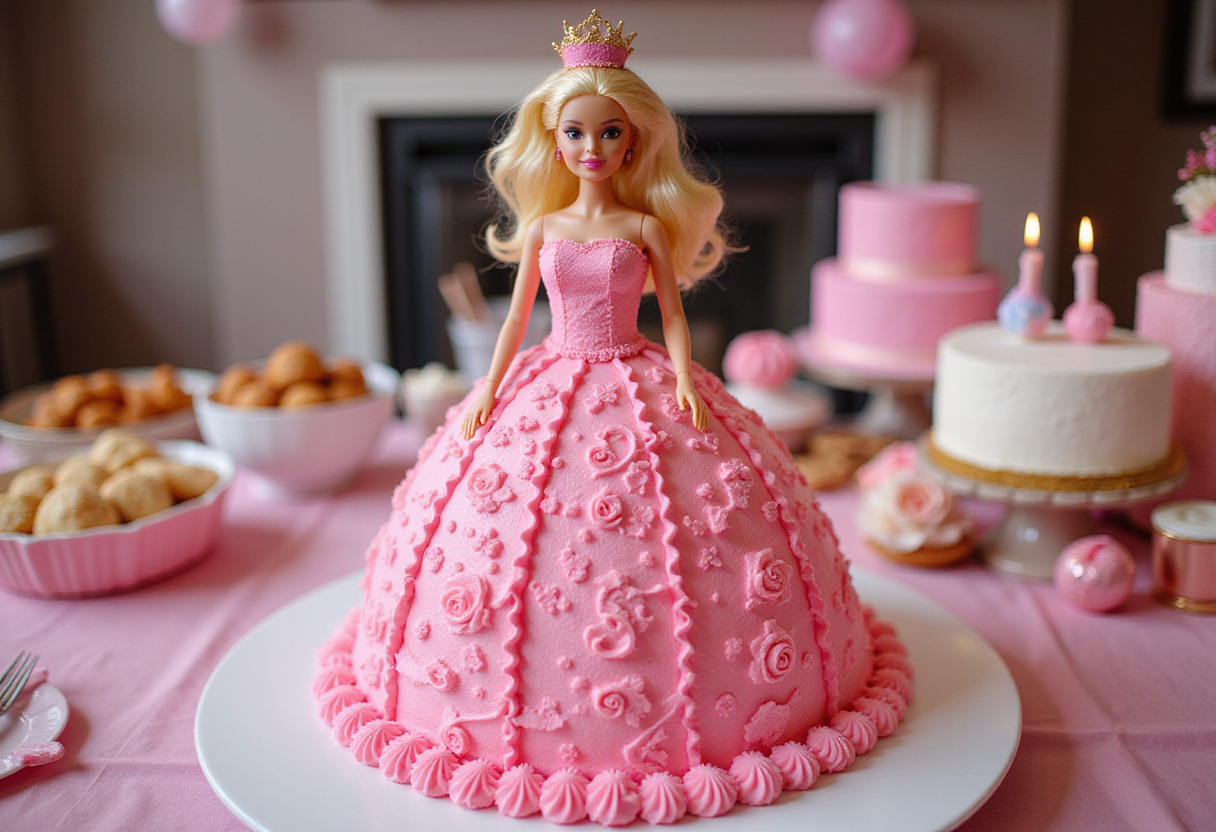
A New Take on Classic Barbie Cake: A Dreamy Pink Delight for All Ages 🎂💖
1. Introduction
The Barbie cake recipe is a timeless classic, bringing joy and wonder to birthdays and celebrations for generations. This iconic cake, often recognized by its whimsical design featuring a Barbie doll as the centerpiece, makes any party feel extra special. But what makes a Barbie cake truly unforgettable? It’s the magic it brings, transforming a simple dessert into a centerpiece of joy. In this article, we’ll explore a fresh and exciting take on the traditional Barbie doll cake, ensuring your creation stands out with both flavor and flair.
Whether you’re planning a spectacular Barbie birthday cake for your little one or just want to add a touch of magic to your baking repertoire, this comprehensive guide will provide you with all the essential steps and insider tips you need. From selecting the perfect cake base to mastering the art of frosting and decoration, we’ll cover every aspect of creating a stunning, delicious, and memorable Barbie themed cake that will undoubtedly be the highlight of any event! If you’re looking for other dessert ideas, be sure to check out our collection of dessert recipes!
2. Understanding the Barbie Cake Recipe
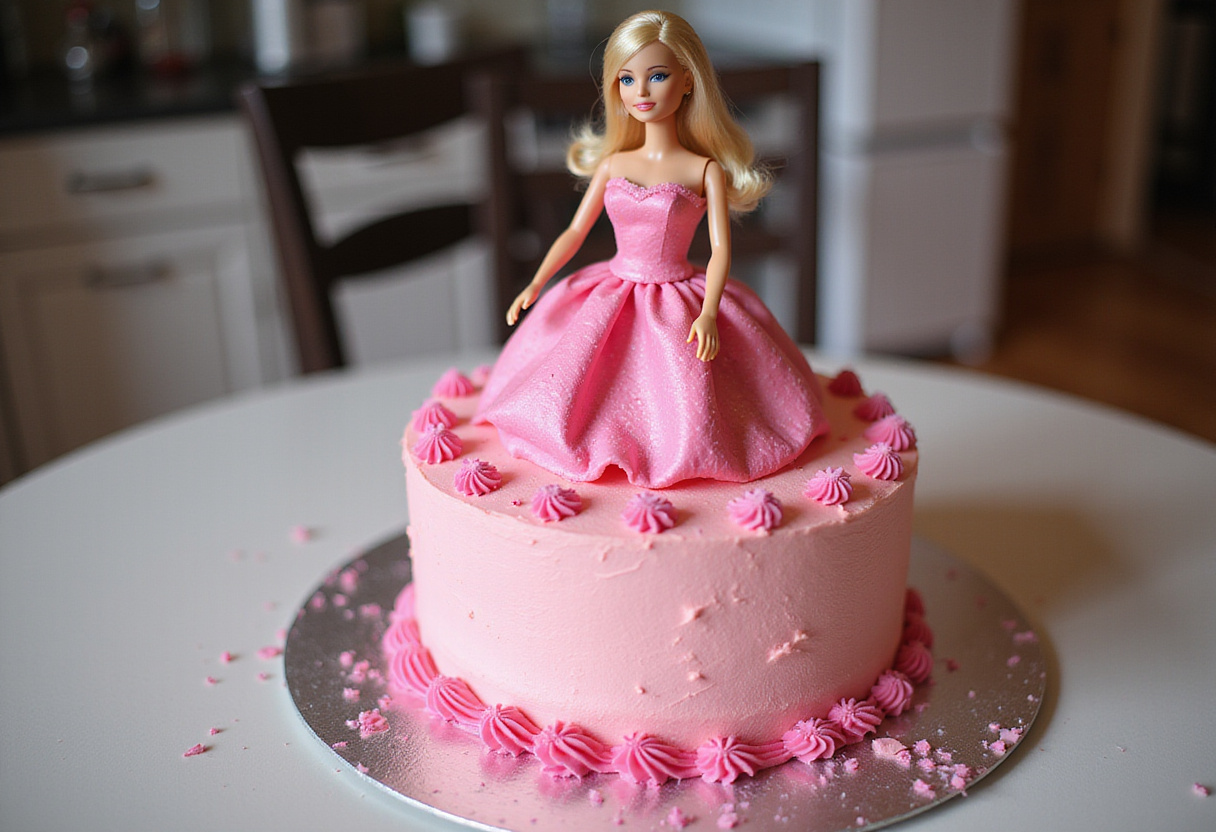
The essence of a Barbie cake recipe lies in its captivating presentation and the joy it brings. Typically, the cake is baked in a dome shape or constructed using multiple layers—this creates the essential full skirt for the doll. Frosting is then meticulously applied to resemble an elegant gown, often adorned with edible decorations that add sparkle and charm.
The doll, usually a Barbie, is carefully placed in the center, making it appear as if she’s gracefully wearing the cake as a magnificent dress. In our updated take, we focus on enhancing both the flavor and visual appeal. We want to ensure that your Barbie doll cake is not only visually stunning but also irresistibly delicious – a treat for the eyes and the taste buds. If you enjoy classic cakes, you might also like our Classic Carrot Cake recipe!
3. Gathering Your Ingredients
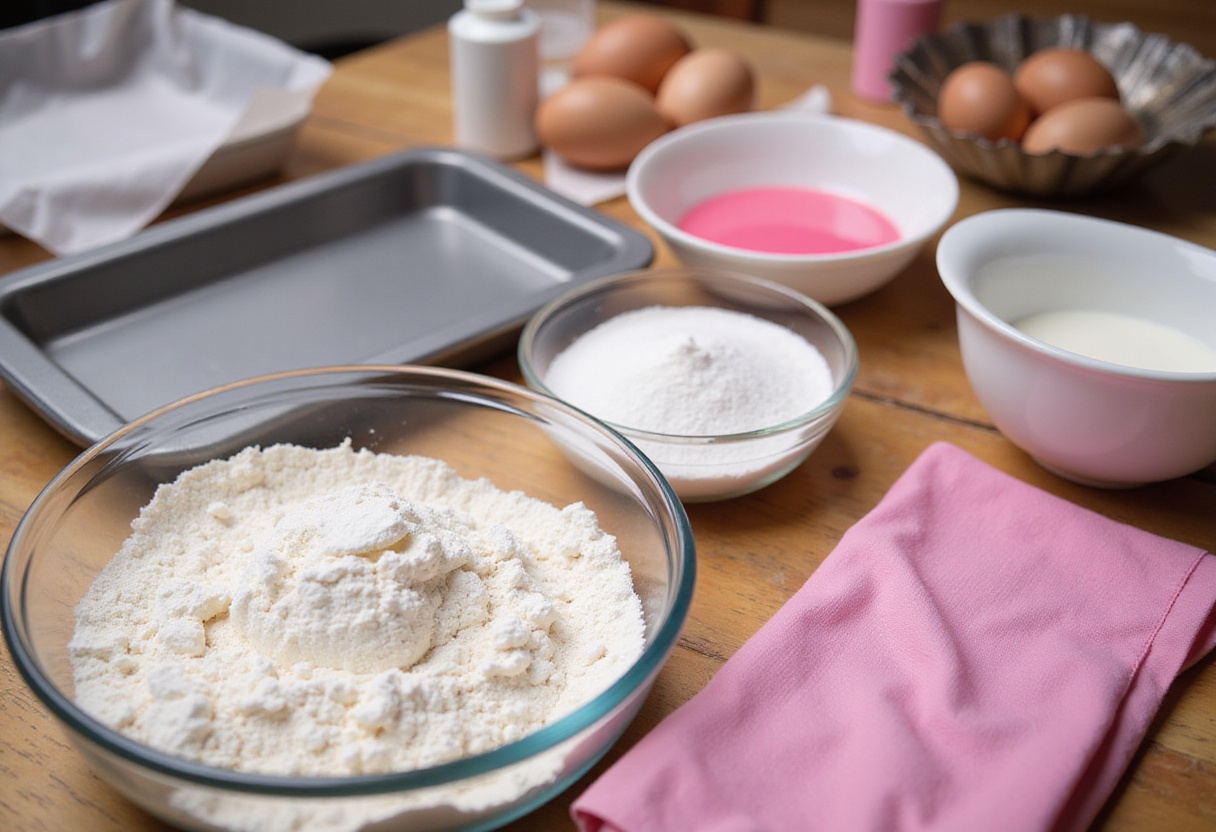
Before you embark on this exciting baking adventure, it’s crucial to ensure you have all the necessary ingredients readily available. Here’s a comprehensive list to get you started:
- Cake mix (vanilla or any flavor you prefer that will complement the overall theme)
- Eggs, oil, and water (as required by the cake mix)
- Pink food coloring (gel food coloring is recommended for vibrant and consistent color)
- Frosting (vanilla or cream cheese – consider using a high-quality brand for smooth application and delightful taste)
- Sprinkles and edible glitter (for adding magical touches to the gown)
- Barbie doll (new and clean, wrapped in plastic wrap below the waist for hygiene)
4. Step-by-Step Instructions for Your Barbie Cake
Let’s get started with baking your dream cake!
Baking the Cake
-
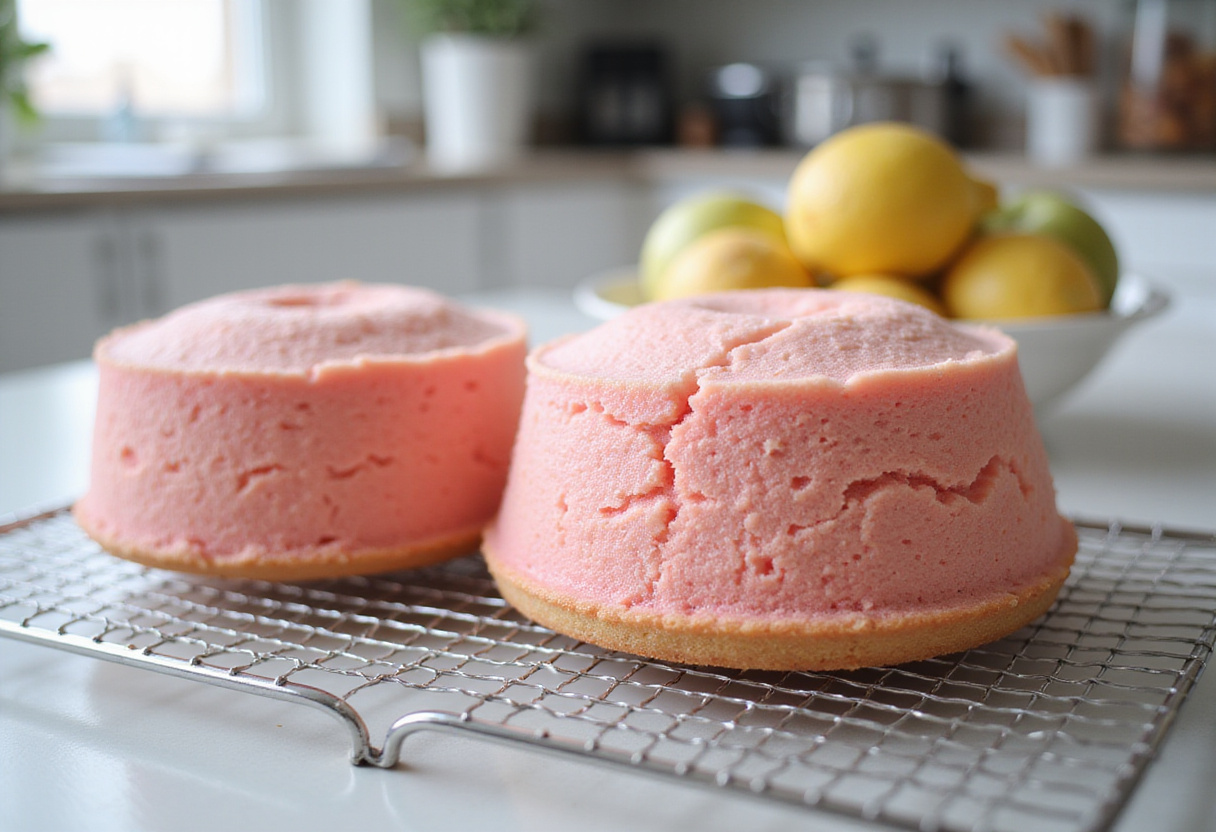
Preheat your oven to 350°F (175°C). This ensures the cake bakes evenly. Grease and flour a dome-shaped baking pan or a large mixing bowl. Alternatively, you can use multiple round cake pans for creating layers. Ensure the pans are thoroughly greased to prevent sticking.
-
Prepare the cake batter according to the instructions on the cake mix box. For a more intense pink color, add pink food coloring gradually until you achieve your desired shade. Remember, you can always add more, but you can’t take it away!
-
Pour the batter carefully into the prepared pan(s), ensuring even distribution. Bake for the time specified in the instructions. Check for doneness by inserting a toothpick into the center; it should come out clean. Baking times may vary, so keep a close eye on the cake.
Preparing the Layers

-
Once the cake is baked, let it cool in the pan for about 10 minutes before transferring it to a wire rack to cool completely. This prevents the cake from breaking apart during handling.
-
If you used multiple round cake pans, level each layer with a serrated knife for a stable and visually appealing base. This ensures that the cake layers stack evenly, providing a professional finish.
Assembling the Barbie Cake
-
If using layers, stack them carefully on top of each other, using frosting as glue between each layer. Carve a hole in the center of the cake that’s appropriately sized to accommodate the Barbie doll’s legs. Ensure the hole is deep enough so the doll stands securely.
-
Insert the Barbie doll gently into the prepared hole, making sure she stands securely. Wrap her lower body meticulously with plastic wrap to maintain cleanliness. This is a crucial step for hygiene.
Decorating the Cake
-
Frost the entire cake evenly with vanilla or cream cheese frosting, creating a gown-like effect. Use a piping bag equipped with various tips to add ruffles, swirls, and other decorative elements for texture and visual interest.
-
Embellish the cake artistically with sprinkles, edible glitter, and other decorations. Let your creativity guide you to craft a truly unique and eye-catching Barbie themed cake that captures the imagination.
5. Tips for the Perfect Barbie Doll Cake
Here are some expert tips to elevate your Barbie cake to perfection:
-
Use Quality Ingredients: Opt for high-quality cake mix and frosting to ensure the best possible taste and texture.
-
Chill the Cake: Chilling the cake thoroughly before frosting makes it significantly easier to handle and decorate, preventing it from crumbling.
-
Get Creative with Frosting: Experiment with different frosting techniques, such as ombre effects or textured patterns, to create a stunning and unique gown design that reflects your personal style.
-
Safety First: Ensure the Barbie doll is impeccably clean and properly wrapped to prevent any contamination of the cake, prioritizing hygiene and safety above all else.
6. Variations on the Classic Barbie Cake
While the traditional pink gown is a timeless choice and always a hit, don’t hesitate to explore different themes and colors to create a truly personalized Barbie cake. Consider crafting a mermaid-themed Barbie cake adorned with enchanting blue and green frosting, complete with edible pearls and shimmering scales. Alternatively, create a princess-themed cake embellished with elegant gold accents, sparkling tiaras, and delicate lace patterns. The possibilities are as limitless as your imagination, and each unique variation adds a personal touch to the Barbie birthday cake, making it a cherished centerpiece.
7. Making it a Barbie Birthday Cake
A Barbie birthday cake transcends the realm of a mere dessert; it becomes a captivating centerpiece that infuses joy and excitement into any celebration. Personalize the cake to reflect the birthday girl’s unique personality and interests by adding her name or age using edible letters. You can also incorporate elements that resonate with her passions, such as her favorite colors, hobbies, or characters, making the cake an unforgettable and cherished highlight of her special day. Need ideas for side dishes? Consider serving some scalloped potatoes!
8. Troubleshooting Common Issues
Even experienced bakers encounter challenges. Here’s how to handle common Barbie cake problems:
-
Cake Cracking: Prevent cracking by baking the cake at a slightly lower temperature for a longer duration, ensuring thorough and even cooking.
-
Frosting Melting: Ensure the cake is completely cooled before applying frosting. If the frosting is too soft, chill it in the refrigerator for a while to achieve the ideal consistency.
-
Doll Instability: Ensure the hole created for the doll is snug and provides a secure fit, while also making sure the base of the cake is stable and level to prevent wobbling.
9. Conclusion
Creating a Barbie cake recipe is a delightful and rewarding way to celebrate special occasions, infusing them with creativity and joy. By diligently following these steps and incorporating the expert tips, you’ll be well-equipped to craft a stunning and delicious Barbie doll cake that becomes the undeniable highlight of any party. Whether it’s a show-stopping Barbie birthday cake or a whimsical baking project undertaken for pure enjoyment, this timeless classic is guaranteed to bring smiles, spark imaginations, and create cherished, lasting memories. So, embrace your inner artist, unleash your creativity, and savor the enchanting process of crafting your own unique Barbie themed cake! For professional guidance, you can also check out resources like Family Spice’s tutorial on making a Barbie cake.
And if you’re curious about the people behind this blog, you can always learn about us!
Print
A New Take on Classic Barbie Cake
- Total Time: 1 hour
- Yield: 12 servings
- Diet: Vegetarian
Description
A New Take on Classic Barbie Cake is a dreamy pink delight that adds magic to any birthday celebration. This updated recipe for the iconic Barbie doll cake combines creativity with delicious flavors, making it a stunning centerpiece for events.
Ingredients
- Cake mix (vanilla or any flavor you prefer)
- Eggs, oil, and water (as required by the cake mix)
- Pink food coloring
- Frosting (vanilla or cream cheese)
- Sprinkles and edible glitter
- Barbie doll (new and clean, wrapped in plastic wrap below the waist)
Instructions
- Preheat your oven to 350°F (175°C). Grease and flour a dome-shaped baking pan or a large mixing bowl. You can also use multiple round cake pans for layering.
- Prepare the cake batter according to the instructions on the cake mix box. Add pink food coloring to achieve your desired shade.
- Pour the batter into the prepared pan(s) and bake for the time specified in the instructions. Check for doneness by inserting a toothpick into the center; it should come out clean.
- Once the cake is baked, let it cool in the pan for about 10 minutes before transferring it to a wire rack to cool completely.
- If you used multiple round cake pans, level each layer with a serrated knife for a stable base.
- If using layers, stack them on top of each other, using frosting as glue. Carve a hole in the center of the cake to accommodate the Barbie doll’s legs.
- Insert the Barbie doll into the hole, ensuring she stands securely. Wrap her lower body with plastic wrap to keep it clean.
- Frost the entire cake with vanilla or cream cheese frosting, creating a gown-like effect. Use a piping bag and various tips to add ruffles, swirls, and other decorative elements.
- Embellish the cake with sprinkles, edible glitter, and other decorations. Get creative with the design to make it a truly unique Barbie themed cake.
Notes
- Use Quality Ingredients: Opt for high-quality cake mix and frosting for the best taste and texture.
- Chill the Cake: Chilling the cake before frosting makes it easier to handle and decorate.
- Get Creative with Frosting: Experiment with different frosting techniques to create a stunning gown design.
- Safety First: Ensure the Barbie doll is clean and properly wrapped to avoid any contamination.
- Prep Time: 30 minutes
- Cook Time: 30 minutes
- Category: Dessert
- Method: Baking
- Cuisine: American
Nutrition
- Serving Size: 1 slice
- Calories: 300 Kcal
- Sugar: 20g
- Sodium: 200mg
- Fat: 12g
- Saturated Fat: 5g
- Unsaturated Fat: 5g
- Trans Fat: 0g
- Carbohydrates: 44g
- Fiber: 1g
- Protein: 3g
- Cholesterol: 30mg