
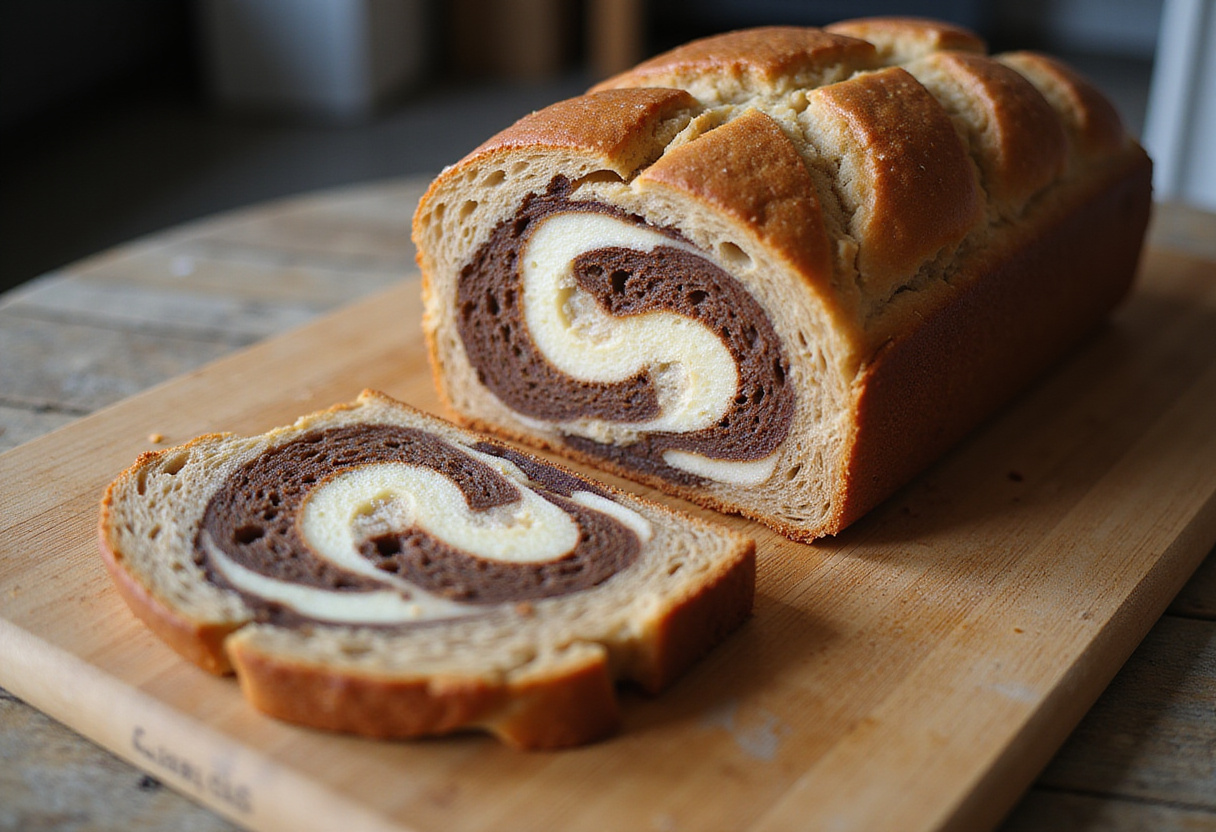
Marble Rye Bread Recipe: Swirls of Flavor in Every Slice 🍞🥨🤤
1. Introduction
Embark on a baking adventure with our delightful marble rye bread recipe! This isn’t just any bread; it’s a visual and flavorful masterpiece, combining the distinctive taste of rye with a beautiful swirled pattern. Imagine the aroma filling your kitchen as you bake this stunning loaf! Making your own rye swirl bread recipe at home allows you to enjoy the freshest, most delicious loaf, perfect for sandwiches, toast, or simply savoring on its own. We think it’s especially good paired with some delicious snacks. Whether you’re an experienced baker or just starting out, this guide will walk you through each step to create the perfect marble bread recipe. And if you’re looking for other baking adventures make sure to check out our homepage for inspiration.
Get ready to impress your friends and family with this stunning and flavorful marble rye bread recipe. This bread is sure to be a conversation starter at your next gathering! And perhaps you can find the perfect dinner to serve with this amazing bread.
2. What is Marble Rye Bread?
Marble rye bread is a type of bread characterized by its distinctive swirled pattern, created by combining light and dark doughs. The dark dough usually gets its color and flavor from ingredients like cocoa powder, coffee, or molasses, contrasting beautifully with the light rye dough. This combination not only makes the bread visually appealing but also adds a depth of flavor that’s hard to resist. It’s a delightful change from your everyday loaf! Our rye swirl bread recipe captures this essence perfectly. You can even use it to make delicious sandwiches, alongside other main dishes.
3. Why You’ll Love This Recipe
- Visually Stunning: The marbled effect is a showstopper, making it perfect for gatherings and special occasions. Imagine presenting this beautiful loaf at your next brunch!
- Delicious Flavor: The combination of rye and added flavors creates a unique and satisfying taste. It’s a flavor explosion in every bite!
- Homemade Goodness: Nothing beats the aroma and taste of freshly baked bread made with your own hands. The love you put into it shines through.
- Versatile: Enjoy it with your favorite sandwich fillings, as toast, or simply as a side to your meal. It’s perfect for breakfast, lunch, or dinner! And if you are looking for something sweet, check out these desserts to combine your bread with.
4. Ingredients You’ll Need
Before you start, make sure you have all your ingredients ready. Quality ingredients make a difference!
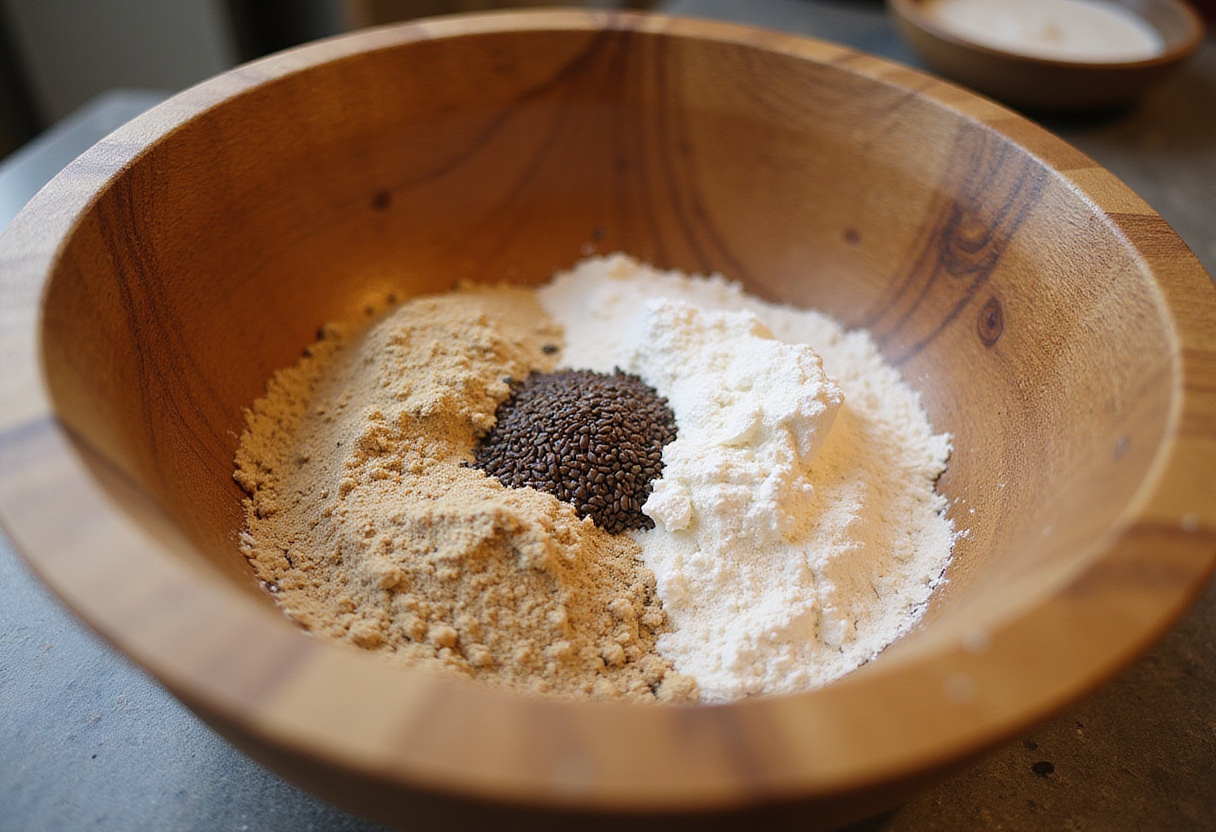
- 3 cups all-purpose flour
- 1 cup rye flour
- 2 teaspoons salt
- 2 teaspoons caraway seeds (optional) – These add a lovely aroma and flavor!
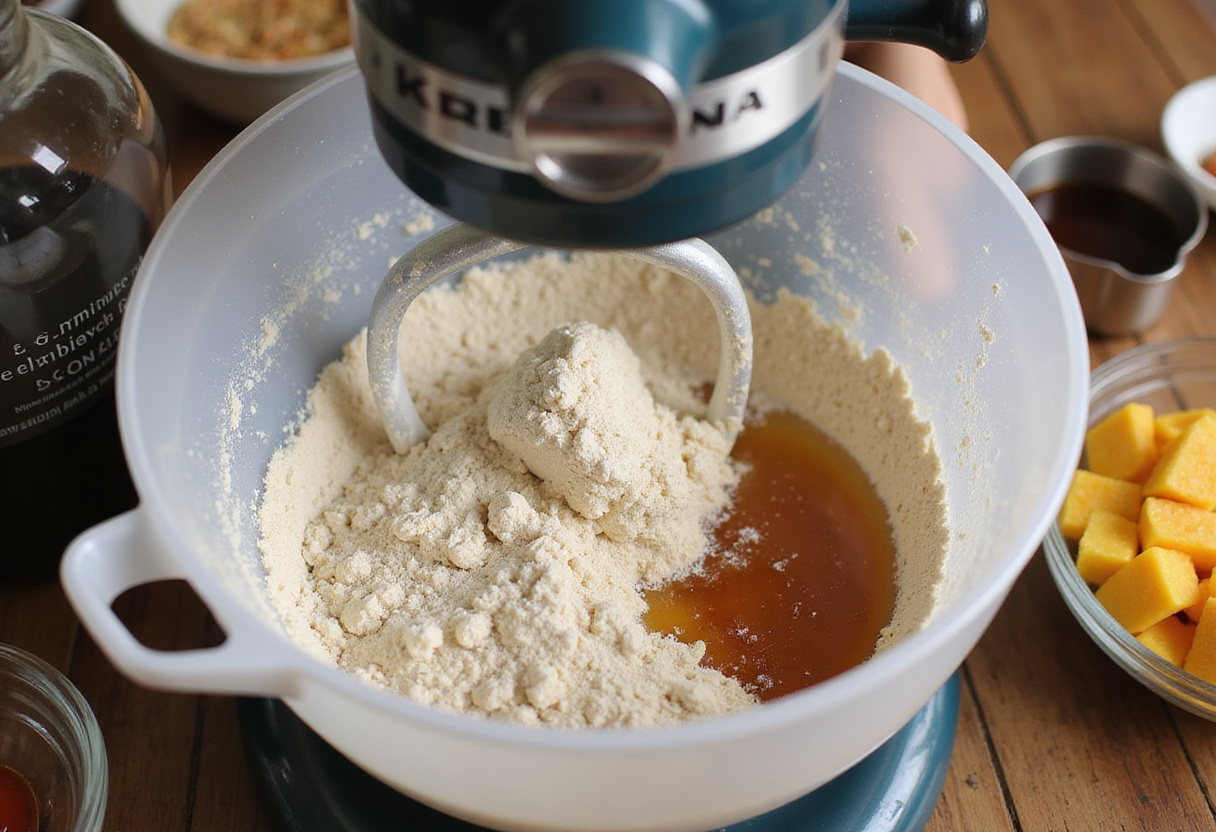
- 2 1/4 teaspoons (1 packet) active dry yeast – We recommend using a reliable brand like Red Star Yeast for best results.
- 1 1/2 cups warm water (105-115°F) – The temperature is crucial for activating the yeast.
- 2 tablespoons vegetable oil
- 2 tablespoons unsweetened cocoa powder – This contributes to the dark color and adds a hint of chocolate.
- 1 tablespoon instant coffee granules – These enhance the cocoa flavor.
- 1 tablespoon molasses – This adds sweetness and depth of flavor.
5. Equipment You’ll Need
Having the right tools makes baking easier and more enjoyable. Get everything ready before you start!
- Large mixing bowl or stand mixer – A stand mixer makes kneading easier, but you can also knead by hand.
- Measuring cups and spoons
- Two small bowls
- 9×5 inch loaf pan
- Clean kitchen towel
- Oven
6. Step-by-Step Instructions
Follow these instructions carefully for a perfect loaf of marble rye bread. Don’t be afraid to take your time and enjoy the process!
1. Prepare the Dough Base
In a large mixing bowl, whisk together all-purpose flour, rye flour, salt, and caraway seeds (if using). In a separate small bowl, dissolve yeast in warm water and let it stand for 5 minutes until foamy. This indicates that the yeast is active and ready to use. Add the yeast mixture and vegetable oil to the flour mixture. Mix until a shaggy dough forms. If using a stand mixer, knead with the dough hook for 6-8 minutes. If kneading by hand, knead on a lightly floured surface for 10 minutes until smooth and elastic. This first step is crucial for a great marble rye bread recipe. A well-kneaded dough is key to a good texture.
2. Divide and Flavor the Dough
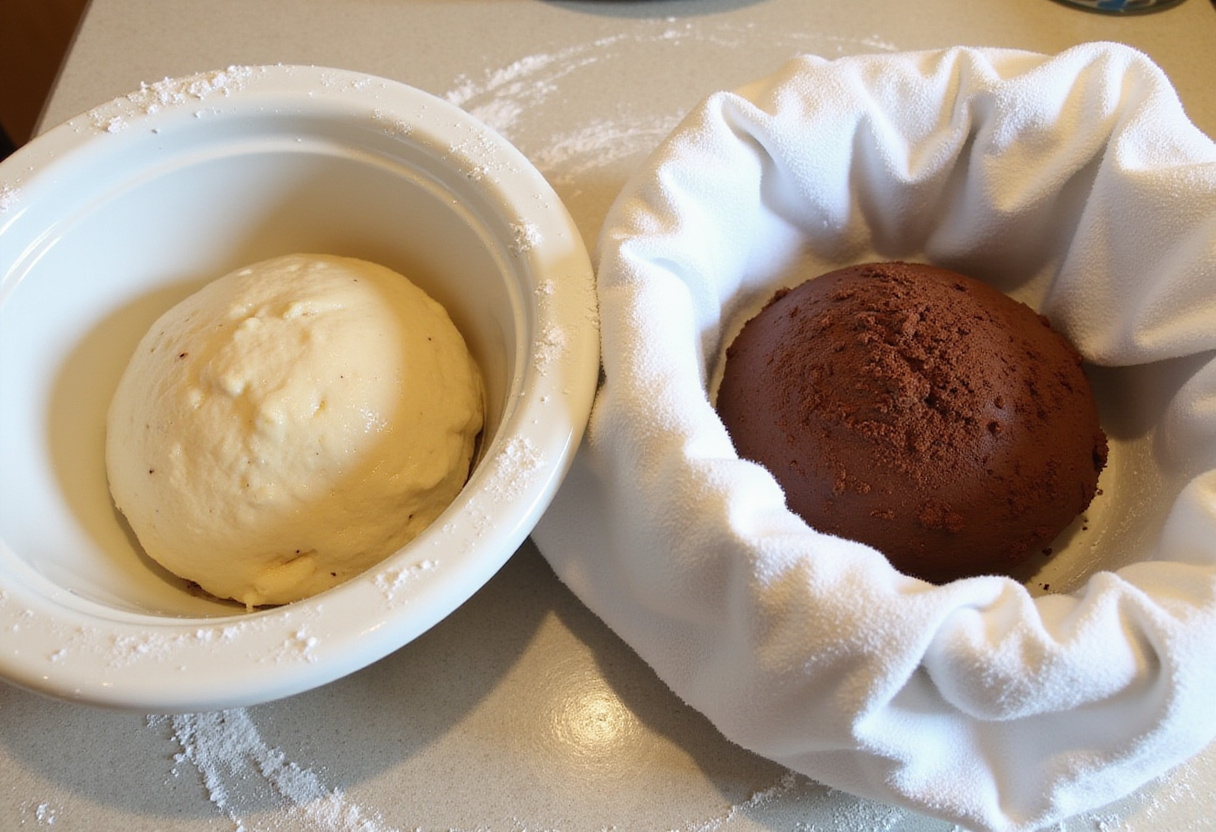
Divide the dough in half. Place one half back in the mixing bowl. In a small bowl, combine cocoa powder, instant coffee granules, and molasses. Add this mixture to one half of the dough and knead until the color is uniform. This process gives the marble bread recipe its unique swirls. Ensure the color is evenly distributed for the best visual effect. Keep the other half of the dough plain.
3. First Proof
Place both doughs in separate, lightly oiled bowls. Cover with a clean kitchen towel and let them rise in a warm place for about 1-1.5 hours or until doubled in size. This step is vital for the texture of your marble rye bread recipe. Properly proofed dough results in a light and airy bread. Patience is key here! If you are interested in learning about us, check out our About page to know more about other types of recipes that we offer and explore this blog.
4. Shape and Bake
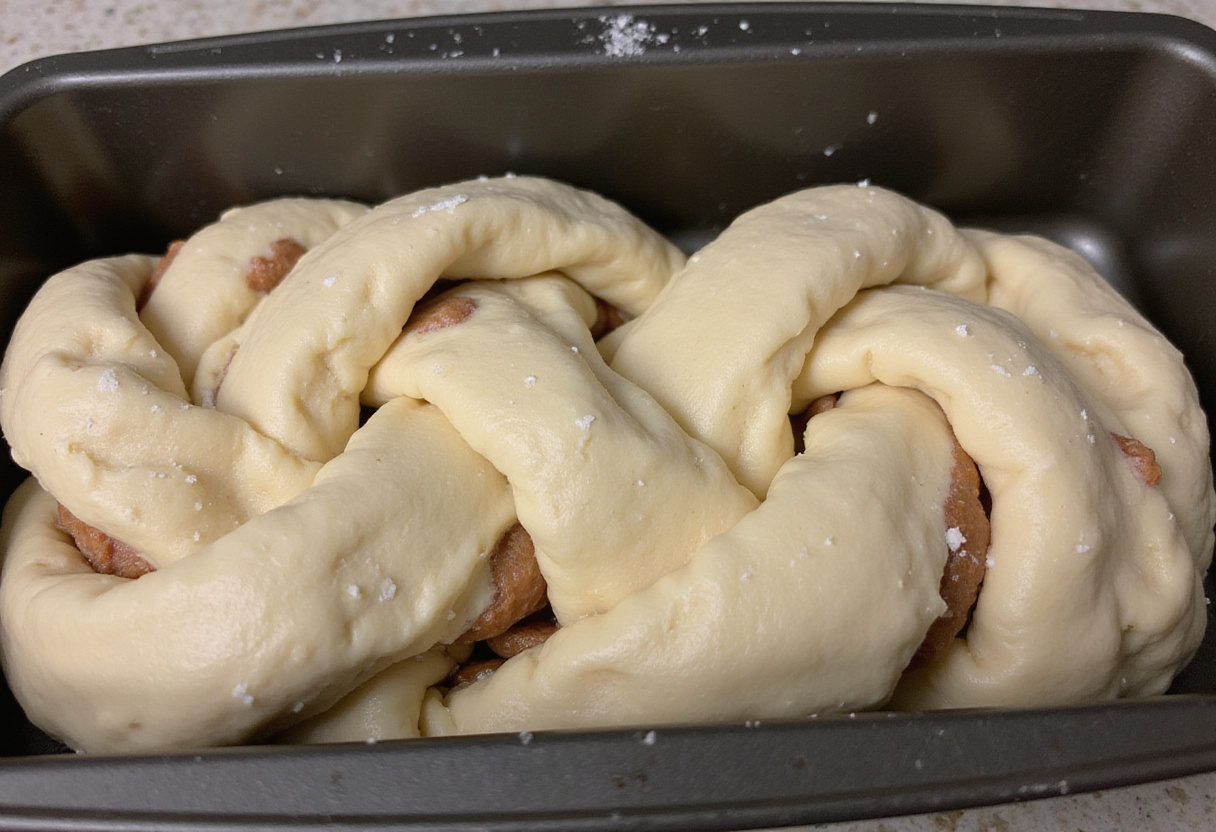
Punch down both doughs gently. On a lightly floured surface, roll each dough into a rectangle of approximately the same size. Place the dark dough rectangle on top of the light dough rectangle. Roll them up tightly together, starting from one end. Place the rolled dough seam-down in a greased 9×5 inch loaf pan. Cover with a towel and let it proof for another 30-45 minutes. Preheat your oven to 350°F (175°C). Bake the marble rye bread recipe for 45-50 minutes, or until golden brown and the internal temperature reaches 200°F (93°C). Let it cool in the pan for 10 minutes before transferring to a wire rack to cool completely before slicing. Cooling completely is essential to prevent a gummy texture.
7. Tips for the Perfect Marble Rye Bread
Here are some extra tips to ensure your marble rye bread is a masterpiece!
- Water Temperature: Ensure the water is warm enough to activate the yeast but not too hot, as it can kill the yeast. Use a thermometer for accuracy.
- Kneading: Proper kneading is essential for developing the gluten, resulting in a good texture. Don’t rush this step!
- Proofing: Allow the dough enough time to rise properly. This will result in a lighter, airier bread. A warm, draft-free environment is ideal.
- Cooling: Let the bread cool completely before slicing to prevent it from becoming gummy. Resist the temptation to cut into it too soon!
- Even Swirl: For a more pronounced swirl, twist the two doughs together before placing them in the loaf pan. Get creative with your swirling technique! You can even check out other breakfast recipes at breakfast
8. Serving Suggestions
Your homemade marble rye bread is incredibly versatile. Here are some serving ideas to get you started:
- Corned beef and mustard sandwiches – A classic combination that’s hard to beat!
- Deli meats and cheeses – Perfect for a quick and easy lunch.
- Cream cheese and smoked salmon – A sophisticated and delicious appetizer.
- A side of hearty soup – The perfect accompaniment on a cold day. Maybe something like these scalloped potatoes?, or perhaps these delicious scalloped potatoes recipes?
- Simply toasted with butter – Sometimes, the simplest things are the best! And make sure to check out this traditional hot cross buns.
9. Conclusion
Congratulations, you’ve successfully baked a beautiful and delicious marble rye bread recipe! Enjoy the satisfaction of creating your own rye swirl bread recipe, perfect for any occasion. Share it with your loved ones and relish the delightful flavors and stunning swirls of this homemade masterpiece. This bread is sure to become a family favorite. Happy baking!
Print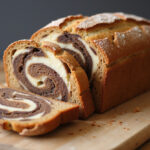
marble rye bread recipe
- Total Time: 1 hour 20 minutes
- Yield: 1 loaf 1x
- Diet: Vegetarian
Description
Embark on a baking adventure with our delightful marble rye bread recipe! This bread combines the distinctive taste of rye with a beautiful swirled pattern, perfect for sandwiches, toast, or savoring on its own.
Ingredients
- 3 cups all-purpose flour
- 1 cup rye flour
- 2 teaspoons salt
- 2 teaspoons caraway seeds (optional)
- 2 1/4 teaspoons (1 packet) active dry yeast
- 1 1/2 cups warm water (105-115°F)
- 2 tablespoons vegetable oil
- 2 tablespoons unsweetened cocoa powder
- 1 tablespoon instant coffee granules
- 1 tablespoon molasses
Instructions
- In a large mixing bowl, whisk together all-purpose flour, rye flour, salt, and caraway seeds (if using). Dissolve yeast in warm water and let it stand for 5 minutes until foamy.
- Add the yeast mixture and vegetable oil to the flour mixture. Mix until a shaggy dough forms. Knead for 6-8 minutes (stand mixer) or 10 minutes (by hand).
- Divide the dough in half, keeping one half plain. In a small bowl, mix cocoa powder, instant coffee, and molasses. Knead this mixture into one half of the dough.
- Place both doughs in separate oiled bowls, cover, and let them rise for about 1-1.5 hours until doubled.
- Punch down both doughs, roll into rectangles, and stack them. Roll tightly together, seam-down, in a greased loaf pan.
- Let it proof for another 30-45 minutes, preheat oven to 350°F (175°C). Bake for 45-50 minutes or until golden and internal temperature reaches 200°F (93°C).
- Cool in the pan for 10 minutes, then transfer to a wire rack to cool completely before slicing.
Notes
- Ensure the water is warm but not too hot to activate the yeast.
- Proper kneading develops gluten for good texture.
- Allow ample rise time for lighter, airier bread.
- Let bread cool completely to prevent gumminess.
- For a more pronounced swirl, twist the doughs together before placing in the pan.
- Prep Time: 30 minutes
- Cook Time: 50 minutes
- Category: Bread
- Method: Baking
- Cuisine: American
Nutrition
- Serving Size: 1 slice
- Calories: 130 Kcal
- Sugar: 1g
- Sodium: 150mg
- Fat: 3g
- Saturated Fat: 0.5g
- Unsaturated Fat: 2g
- Trans Fat: 0g
- Carbohydrates: 24g
- Fiber: 2g
- Protein: 4g
- Cholesterol: 0mg